

OpenWRT: Microsoft Azure to Cloudera CDH via VPN Gateway
Configuring StrongSwan on OpenWRT (working)
Ultimately, the final working configuration could be achieved with OpenWRT. Reason being is due to the fact that all required StrongSwan modules are available for OpenWRT, or at least were available at the time of this writing.
ah4
ah6
esp4
esp6
xfrm4_tunnel
xfrm6_tunnel
xfrm_user
ip_tunnel
tunnel
tunnel6
xfrm4_mode_tunnel
xfrm6_mode_tunnel
The list of required kernel modules can be found on the StrongSwan Kernel Modules page. Let’s begin. Ensure all StrongSwan packages are installed. Most of these should already be installed on your device however, for completness, I’m including all kmod, ipsed and strongswan packages.
# opkg update
# opkg install ipsec-tools iptables-mod-ipsec kmod-brcmfmac kmod-brcmutil kmod-cfg80211 kmod-crypto-acompress kmod-crypto-aead kmod-crypto-authenc kmod-crypto-cbc kmod-crypto-ctr kmod-crypto-deflate kmod-crypto-des kmod-crypto-echainiv kmod-crypto-gcm kmod-crypto-gf128 kmod-crypto-ghash kmod-crypto-hash kmod-crypto-hmac kmod-crypto-iv kmod-crypto-manager kmod-crypto-md5 kmod-crypto-null kmod-crypto-pcompress kmod-crypto-rng kmod-crypto-seqiv kmod-crypto-sha1 kmod-crypto-sha256 kmod-crypto-user kmod-crypto-wq kmod-fs-vfat kmod-hid kmod-hid-generic kmod-input-core kmod-input-evdev kmod-ip-vti kmod-ip6tables kmod-ipsec kmod-ipsec4 kmod-ipsec6 kmod-ipt-conntrack kmod-ipt-conntrack-extra kmod-ipt-core kmod-ipt-ipsec kmod-ipt-ipset kmod-ipt-nat kmod-ipt-nat-extra kmod-ipt-offload kmod-iptunnel kmod-iptunnel4 kmod-iptunnel6 kmod-lib-crc-ccitt kmod-lib-zlib-deflate kmod-lib-zlib-inflate kmod-mmc kmod-nf-conntrack kmod-nf-conntrack6 kmod-nf-flow kmod-nf-ipt kmod-nf-ipt6 kmod-nf-nat kmod-nf-reject kmod-nf-reject6 kmod-nfnetlink kmod-nls-base kmod-nls-cp437 kmod-nls-iso8859-1 kmod-nls-utf8 kmod-ppp kmod-pppoe kmod-pppox kmod-sit kmod-slhc kmod-sound-arm-bcm2835 kmod-sound-core kmod-tun kmod-usb-core kmod-usb-hid strongswan strongswan-charon strongswan-charon-cmd strongswan-default strongswan-full strongswan-ipsec strongswan-isakmp strongswan-libtls strongswan-minimal strongswan-mod-addrblock strongswan-mod-aes strongswan-mod-af-alg strongswan-mod-agent strongswan-mod-attr strongswan-mod-attr-sql strongswan-mod-blowfish strongswan-mod-ccm strongswan-mod-cmac strongswan-mod-connmark strongswan-mod-constraints strongswan-mod-coupling strongswan-mod-ctr strongswan-mod-curl strongswan-mod-curve25519 strongswan-mod-des strongswan-mod-dhcp strongswan-mod-dnskey strongswan-mod-duplicheck strongswan-mod-eap-identity strongswan-mod-eap-md5 strongswan-mod-eap-mschapv2 strongswan-mod-eap-radius strongswan-mod-eap-tls strongswan-mod-farp strongswan-mod-fips-prf strongswan-mod-forecast strongswan-mod-gcm strongswan-mod-gcrypt strongswan-mod-gmp strongswan-mod-gmpdh strongswan-mod-ha strongswan-mod-hmac strongswan-mod-kernel-netlink strongswan-mod-ldap strongswan-mod-led strongswan-mod-load-tester strongswan-mod-md4 strongswan-mod-md5 strongswan-mod-mysql strongswan-mod-nonce strongswan-mod-openssl strongswan-mod-pem strongswan-mod-pgp strongswan-mod-pkcs1 strongswan-mod-pkcs11 strongswan-mod-pkcs12 strongswan-mod-pkcs7 strongswan-mod-pkcs8 strongswan-mod-pubkey strongswan-mod-random strongswan-mod-rc2 strongswan-mod-resolve strongswan-mod-revocation strongswan-mod-sha1 strongswan-mod-sha2 strongswan-mod-smp strongswan-mod-socket-default strongswan-mod-socket-dynamic strongswan-mod-sql strongswan-mod-sqlite strongswan-mod-sshkey strongswan-mod-stroke strongswan-mod-test-vectors strongswan-mod-uci strongswan-mod-unity strongswan-mod-updown strongswan-mod-vici strongswan-mod-whitelist strongswan-mod-x509 strongswan-mod-xauth-eap strongswan-mod-xauth-generic strongswan-mod-xcbc strongswan-pki strongswan-scepclient strongswan-swanctl
The configuration for StrongSwan is as follows:
root@OWRT01:~# cat /etc/strongswan.conf
# strongswan.conf – strongSwan configuration file
#
# Refer to the strongswan.conf(5) manpage for details
#
# Configuration changes should be made in the included files
# Verbosity levels
# -1: Absolutely silent
# 0: Very basic auditing logs, (e.g. SA up/SA down)
# 1: Generic control flow with errors, a good default to see whats going on
# 2: More detailed debugging control flow
# 3: Including RAW data dumps in Hex
# 4: Also include sensitive material in dumps, e.g. keys
charon {
load_modular = yes
plugins {
include strongswan.d/charon/*.conf
}
filelog {
charon {
path = /var/log/charon.log
time_format = %b %e %T
append = no
default = 0 # in case troubleshoot is required switch this to 2
}
stderr {
ike = 1 # in case troubleshoot is required switch this to 2
knl = 1 # in case troubleshoot is required switch this to 3
ike_name = yes
}
}
syslog {
# enable logging to LOG_DAEMON, use defaults
daemon {
}
# minimalistic IKE auditing logging to LOG_AUTHPRIV
auth {
default = 1 # in case troubleshoot is required switch this to 2
ike = 1 # in case troubleshoot is required switch this to 2
}
}
plugins {
kernel-netlink {
fwmark = !0x42
}
load-tester {
# enable the plugin
enable = no
# use 4 threads to initiate connections simultaneously
initiators = 4
# each thread initiates 1000 connections
iterations = 1000
# delay each initiation in each thread by 20ms
delay = 20
# fake the kernel interface to avoid SA conflicts
fake_kernel = yes
}
}
}
include strongswan.d/*.conf
root@OWRT01:~#
The configuration for IPSec is as follows:
root@OWRT01:~# cat /etc/ipsec.conf
# ipsec.conf – strongSwan IPsec configuration file
# basic configuration
config setup
# strictcrlpolicy=yes
# uniqueids = no
# Add connections here.
conn %default
# dpdaction=none
dpdaction=clear
keyexchange=ikev2
forceencaps=yes
fragmentation=yes
keylife=3600s
# ikelifetime=28800s
ikelifetime=27000s
rekey=yes
rekeymargin=3m
keyingtries=1
mobike=no
lifebytes=102400000
type=tunnel
# auto=start
auto=route
authby=secret
ike=aes256-sha2_256-modp1024,aes256-sha1-modp1024
esp=aes256gcm16,aes256-sha1
conn remote-to-asus
left=192.168.0.6
leftid=100.100.100.100
# leftfirewall=yes
right=192.168.0.12
rightid=123.123.123.123
# rightfirewall=yes
# leftsubnet=0.0.0.0/0
leftsubnet=10.10.0.0/24,10.10.10.0/24,10.10.20.0/24,10.10.30.0/24 # Remote network subnet defined in public cloud
# rightsubnet=0.0.0.0/0
rightsubnet=192.168.0.0/24,10.0.0.0/24,10.1.0.0/24,10.2.0.0/24,10.3.0.0/24 # Home LAB – Local
conn asus-to-remote
left=192.168.0.12
leftid=100.100.100.100
# leftfirewall=yes
right=192.168.0.6
rightid=192.168.0.12
# rightfirewall=yes
conn asus-any-to-remote
left=192.168.0.12
leftid=%any
# leftfirewall=yes
right=192.168.0.6
rightid=100.100.100.100
# rightfirewall=yes
conn azure-s2s
# ———-
# LEFT
# ———-
# left=123.123.123.123 # IP address of your on-premises gateway
left=192.168.0.12 # IP address of your on-premises gateway
leftfirewall=yes
# leftid=%any
# leftsubnet=0.0.0.0/0
# ———-
# RIGHT
# ———-
right=100.100.100.100
rightfirewall=yes
# rightsubnet=0.0.0.0/0
# rightid=192.168.0.6 # Remote VPN gateway IP address
root@OWRT01:~#
The secrets file included the following:
root@OWRT01:~# cat /etc/ipsec.secrets
# /etc/ipsec.secrets – strongSwan IPsec secrets file
123.123.123.123 100.100.100.100 : PSK “ym9mK2Mpr6nEVGZG”
192.168.0.6 192.168.0.16 : PSK “ym9mK2Mpr6nEVGZG”
192.168.0.16 192.168.0.6 : PSK “ym9mK2Mpr6nEVGZG”
root@OWRT01:~#
However, there was a slight issue with this method. The routes installed in the kernel tables were placed in table 220. However, OSPF uses table 254. This means OSPF could not properly route traffic from the Azure VPN GW to the on-prem StrongSwan GW, and vice versa. Since there is no real interface for OSPF to bind too, it is not able to pull in the Azure VPN GW VLAN routes.
root@OWRT01:~# ip route list table 220
10.10.0.0/24 via 192.168.0.6 dev br-lan proto static src 192.168.0.12
10.10.10.0/24 via 192.168.0.6 dev br-lan proto static src 192.168.0.12
10.10.20.0/24 via 192.168.0.6 dev br-lan proto static src 192.168.0.12
10.10.30.0/24 via 192.168.0.6 dev br-lan proto static src 192.168.0.12
100.100.100.100 via 192.168.0.1 dev br-lan proto static src 192.168.0.12
192.168.0.6 via 192.168.0.6 dev br-lan proto static src 192.168.0.12
root@OWRT01:~#
root@OWRT01:~#
root@OWRT01:~# ip route list table 254
default via 192.168.0.1 dev br-lan proto static
10.0.0.0/24 via 192.168.0.1 dev br-lan proto zebra metric 20
10.1.0.0/24 via 192.168.0.1 dev br-lan proto zebra metric 20
10.1.1.0/24 proto zebra metric 20
nexthop via 192.168.0.6 dev br-lan weight 1
nexthop via 192.168.0.16 dev br-lan weight 1
10.2.0.0/24 via 192.168.0.1 dev br-lan proto zebra metric 20
10.3.0.0/24 via 192.168.0.1 dev br-lan proto zebra metric 20
123.123.123.321/27 via 192.168.0.6 dev br-lan proto zebra metric 20
192.168.0.0/24 dev br-lan proto kernel scope link src 192.168.0.12
192.168.45.0/24 via 192.168.0.6 dev br-lan proto zebra metric 20
192.168.75.0/24 via 192.168.0.6 dev br-lan proto zebra metric 20
root@OWRT01:~#
There is no easy way to map routes between the tables. Possibly using BIRD instead of Quagga would do the trick. However, let’s try VTI interfaces first. This will let Quagga (OSPF) to pull in the routing info from the VTI interface, thereby resolving the routing issue.
Configuring StrongSwan on OpenWRT w/ VTI Interfaces (working)
In order to allow traffic routing from all local VLAN’s to all the new Azure VPN GW VNET’s , and vice versa, VTI interfaces can be used. XFRM interfaces are superior however could not get these newer interfaces working on OpenWRT yet. First, let’s create the interfaces.
Set kernel parameters:
sysctl -w net.ipv4.conf.vti1.rp_filter=0
sysctl -w net.ipv4.conf.vti1.disable_policy=1
Create the tunnel:
ip tunnel add vti0 local 192.168.0.13 remote 100.100.100.100 mode vti key 42
ip link set vti0 up
ip route add 10.10.0.0/24 dev vti0
ip route add 10.10.10.0/24 dev vti0
ip route add 10.10.20.0/24 dev vti0
ip route add 10.10.30.0/24 dev vti0
The VLAN’s added to the routing table above are of the Azure VPN GW Side. (remote or otherwise known as right side). In order to enable and use these VTI interfaces, add the following lines to ipsec.conf default section above:
# Add connections here.
conn %default
# dpdaction=none
dpdaction=clear
keyexchange=ikev2
forceencaps=yes
fragmentation=yes
keylife=3600s
# ikelifetime=28800s
ikelifetime=27000s
rekey=yes
rekeymargin=3m
keyingtries=1
mobike=no
lifebytes=102400000
type=tunnel
# auto=start
auto=route
authby=secret
ike=aes256-sha2_256-modp1024,aes256-sha1-modp1024
esp=aes256gcm16,aes256-sha1
mark=42
mark_in=42
mark_out=42
A source of additional information can be found here as well. Save and restart ipsec. Test pinging the VLAN’s first from the Azure VM created on one of the remote VLAN’s:
[root@azure-r01wn01 ~]# ping 192.168.0.65
PING 192.168.0.65 (192.168.0.65) 56(84) bytes of data.
64 bytes from 192.168.0.65: icmp_seq=1 ttl=62 time=51.8 ms
64 bytes from 192.168.0.65: icmp_seq=2 ttl=62 time=54.9 ms
64 bytes from 192.168.0.65: icmp_seq=3 ttl=62 time=46.9 ms
64 bytes from 192.168.0.65: icmp_seq=4 ttl=62 time=59.0 ms
^C
— 192.168.0.65 ping statistics —
4 packets transmitted, 4 received, 0% packet loss, time 3004ms
rtt min/avg/max/mdev = 46.987/53.198/59.082/4.421 ms
[root@azure-r01wn01 ~]#
[root@azure-r01wn01 ~]# ping 10.3.0.8
PING 10.3.0.8 (10.3.0.8) 56(84) bytes of data.
64 bytes from 10.3.0.8: icmp_seq=1 ttl=62 time=97.6 ms
64 bytes from 10.3.0.8: icmp_seq=2 ttl=62 time=51.5 ms
64 bytes from 10.3.0.8: icmp_seq=3 ttl=62 time=48.1 ms
^C
— 10.3.0.8 ping statistics —
3 packets transmitted, 3 received, 0% packet loss, time 2003ms
rtt min/avg/max/mdev = 48.165/65.769/97.605/22.554 ms
[root@azure-r01wn01 ~]# ping 192.168.0.222
PING 192.168.0.222 (192.168.0.222) 56(84) bytes of data.
^C
— 192.168.0.222 ping statistics —
1 packets transmitted, 0 received, 100% packet loss, time 0ms
[root@azure-r01wn01 ~]# ping 192.168.0.220
PING 192.168.0.220 (192.168.0.220) 56(84) bytes of data.
64 bytes from 192.168.0.220: icmp_seq=1 ttl=126 time=52.6 ms
64 bytes from 192.168.0.220: icmp_seq=2 ttl=126 time=48.6 ms
^C
— 192.168.0.220 ping statistics —
2 packets transmitted, 2 received, 0% packet loss, time 1001ms
rtt min/avg/max/mdev = 48.665/50.651/52.637/1.986 ms
[root@azure-r01wn01 ~]# ping 192.168.0.46
PING 192.168.0.46 (192.168.0.46) 56(84) bytes of data.
64 bytes from 192.168.0.46: icmp_seq=1 ttl=62 time=49.3 ms
64 bytes from 192.168.0.46: icmp_seq=2 ttl=62 time=47.4 ms
^C
— 192.168.0.46 ping statistics —
2 packets transmitted, 2 received, 0% packet loss, time 1001ms
rtt min/avg/max/mdev = 47.443/48.387/49.331/0.944 ms
[root@azure-r01wn01 ~]#
Next, test ping the Azure VPN GW’s or a host on the Azure network, from the on-prem side:
root@OWRT01:~# ping 10.10.10.4
PING 10.10.10.4 (10.10.10.4): 56 data bytes
64 bytes from 10.10.10.4: seq=0 ttl=64 time=45.746 ms
64 bytes from 10.10.10.4: seq=1 ttl=64 time=50.367 ms
^C
— 10.10.10.4 ping statistics —
2 packets transmitted, 2 packets received, 0% packet loss
round-trip min/avg/max = 45.746/48.056/50.367 ms
root@OWRT01:~#
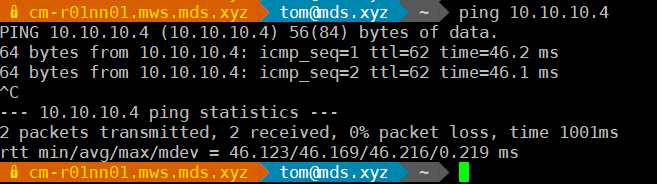
And again from one of the machines behind the on-prem StrongSwan VPN GW.
? cm-r01nn01.mws.mds.xyz ? tom@mds.xyz ? ~ ? ping 10.10.10.4
PING 10.10.10.4 (10.10.10.4) 56(84) bytes of data.
64 bytes from 10.10.10.4: icmp_seq=1 ttl=62 time=46.2 ms
64 bytes from 10.10.10.4: icmp_seq=2 ttl=62 time=46.1 ms
^C
— 10.10.10.4 ping statistics —
2 packets transmitted, 2 received, 0% packet loss, time 1001ms
rtt min/avg/max/mdev = 46.123/46.169/46.216/0.219 ms
? cm-r01nn01.mws.mds.xyz ? tom@mds.xyz ? ~ ?
Verify the routing information in OSPF (Quagga). Notice how the VTI interface is now recognized;
root@OWRT01:~# vtysh
Hello, this is Quagga (version 1.1.1).
Copyright 1996-2005 Kunihiro Ishiguro, et al.
OWRT01# sh running-config
Building configuration…
Current configuration:
!
hostname OWRT01
!
password s3cretp@$$w0rd
enable password s3cretp@$$w0rd
!
interface br-lan
!
interface eth0
!
interface ip_vti0
!
interface lo
!
interface sit0
!
interface vti0
ip ospf network broadcast
!
router ospf
ospf router-id 192.168.0.12
log-adjacency-changes
redistribute kernel
redistribute connected
redistribute static
network 192.168.0.0/24 area 0.0.0.0
default-information originate
!
ip forwarding
ipv6 forwarding
!
line vty
!
end
OWRT01# sh ip ospf route
============ OSPF network routing table ============
N 10.0.0.0/24 [11] area: 0.0.0.0
via 192.168.0.1, br-lan
N 10.1.0.0/24 [11] area: 0.0.0.0
via 192.168.0.1, br-lan
N 10.2.0.0/24 [11] area: 0.0.0.0
via 192.168.0.1, br-lan
N 10.3.0.0/24 [11] area: 0.0.0.0
via 192.168.0.1, br-lan
N 192.168.0.0/24 [10] area: 0.0.0.0
directly attached to br-lan
============ OSPF router routing table =============
R 192.168.0.6 [10] area: 0.0.0.0, ASBR
via 192.168.0.6, br-lan
R 192.168.0.16 [10] area: 0.0.0.0, ASBR
via 192.168.0.16, br-lan
============ OSPF external routing table ===========
N E2 0.0.0.0/0 [10/10] tag: 0
via 192.168.0.6, br-lan
N E2 10.1.1.0/24 [10/20] tag: 0
via 192.168.0.6, br-lan
via 192.168.0.16, br-lan
N E2 123.123.123.321/27 [10/20] tag: 0
via 192.168.0.6, br-lan
N E2 192.168.45.0/24 [10/20] tag: 0
via 192.168.0.6, br-lan
N E2 192.168.75.0/24 [10/20] tag: 0
via 192.168.0.6, br-lan
OWRT01# sh ip ospf database
OSPF Router with ID (192.168.0.12)
Router Link States (Area 0.0.0.0)
Link ID ADV Router Age Seq# CkSum Link count
192.168.0.1 192.168.0.1 699 0x80001e13 0x4822 6
192.168.0.3 192.168.0.3 1484 0x80001650 0x2978 2
192.168.0.6 192.168.0.6 312 0x80001aea 0x6326 1
192.168.0.7 192.168.0.7 597 0x80000194 0x53a4 1
192.168.0.12 192.168.0.12 1335 0x80000077 0x8c78 1
192.168.0.16 192.168.0.16 71 0x80000b03 0x4c16 1
Net Link States (Area 0.0.0.0)
Link ID ADV Router Age Seq# CkSum
192.168.0.3 192.168.0.3 1241 0x800002cd 0x7468
AS External Link States
Link ID ADV Router Age Seq# CkSum Route
0.0.0.0 192.168.0.6 272 0x80000222 0xce67 E2 0.0.0.0/0 [0x0]
0.0.0.0 192.168.0.12 1325 0x8000005e 0x7615 E2 0.0.0.0/0 [0x0]
10.1.1.0 192.168.0.6 322 0x80000e72 0xd4ee E2 10.1.1.0/24 [0x0]
10.1.1.0 192.168.0.16 21 0x800002ec 0xc783 E2 10.1.1.0/24 [0x0]
10.10.0.0 192.168.0.12 1762 0x80000001 0x5cd8 E2 10.10.0.0/24 [0x0]
10.10.10.0 192.168.0.12 1762 0x80000001 0xed3d E2 10.10.10.0/24 [0x0]
10.10.20.0 192.168.0.12 1762 0x80000001 0x7fa1 E2 10.10.20.0/24 [0x0]
10.10.30.0 192.168.0.12 715 0x80000002 0x0f07 E2 10.10.30.0/24 [0x0]
123.123.123.321 192.168.0.6 412 0x800000a2 0x5a89 E2 123.123.123.321/27 [0x0]
192.168.45.0 192.168.0.6 322 0x80000ee4 0xe6df E2 192.168.45.0/24 [0x0]
192.168.75.0 192.168.0.6 352 0x80000edf 0xa508 E2 192.168.75.0/24 [0x0]
OWRT01#
Now that the routes are set and OSPF brought them in, it is able to share this information with the rest of the routers on the infrastructure, enabling access to the Azure resources.
Using BIRD instead of Quagga and skipping the VTI Interfaces
To test and document in time.
Verification
Ensure connectivity exists between the Azure VM and on-prem environment. Ping internal VLAN’s to ensure connectivity is there. Some of the items you’ll want to verify is the XFRM policy. If you see no policies listed using this command, then the VLAN to VLAN mapping isn’t working.
root@OWRT01:~# ip xfrm policy
src 0.0.0.0/0 dst 0.0.0.0/0
socket in priority 0
src 0.0.0.0/0 dst 0.0.0.0/0
socket out priority 0
src 0.0.0.0/0 dst 0.0.0.0/0
socket in priority 0
src 0.0.0.0/0 dst 0.0.0.0/0
socket out priority 0
src ::/0 dst ::/0
socket in priority 0
src ::/0 dst ::/0
socket out priority 0
src ::/0 dst ::/0
socket in priority 0
src ::/0 dst ::/0
socket out priority 0
root@OWRT01:~#
The policy should show something similar to the following, with all routes defined:
root@OWRT01:~# ip xfrm policy
src 192.168.0.0/24 dst 10.10.30.0/24
dir out priority 375423
tmpl src 192.168.0.12 dst 192.168.0.6
proto esp spi 0x81739ca2 reqid 1 mode tunnel
src 10.10.30.0/24 dst 192.168.0.0/24
dir fwd priority 375423
tmpl src 192.168.0.6 dst 192.168.0.12
proto esp reqid 1 mode tunnel
src 10.10.30.0/24 dst 192.168.0.0/24
dir in priority 375423
tmpl src 192.168.0.6 dst 192.168.0.12
proto esp reqid 1 mode tunnel
src 192.168.0.0/24 dst 10.10.20.0/24
dir out priority 375423
tmpl src 192.168.0.12 dst 192.168.0.6
proto esp spi 0x81739ca2 reqid 1 mode tunnel
.
.
.
src 192.168.0.12/32 dst 192.168.0.6/32
dir out priority 367232
tmpl src 192.168.0.12 dst 192.168.0.6
proto esp reqid 2 mode tunnel
src 192.168.0.6/32 dst 192.168.0.12/32
dir fwd priority 367232
tmpl src 192.168.0.6 dst 192.168.0.12
proto esp reqid 2 mode tunnel
src 192.168.0.6/32 dst 192.168.0.12/32
dir in priority 367232
tmpl src 192.168.0.6 dst 192.168.0.12
proto esp reqid 2 mode tunnel
src 0.0.0.0/0 dst 0.0.0.0/0
socket in priority 0
src 0.0.0.0/0 dst 0.0.0.0/0
socket out priority 0
src 0.0.0.0/0 dst 0.0.0.0/0
socket in priority 0
src 0.0.0.0/0 dst 0.0.0.0/0
socket out priority 0
src ::/0 dst ::/0
socket in priority 0
src ::/0 dst ::/0
socket out priority 0
src ::/0 dst ::/0
socket in priority 0
src ::/0 dst ::/0
socket out priority 0
root@OWRT01:~#
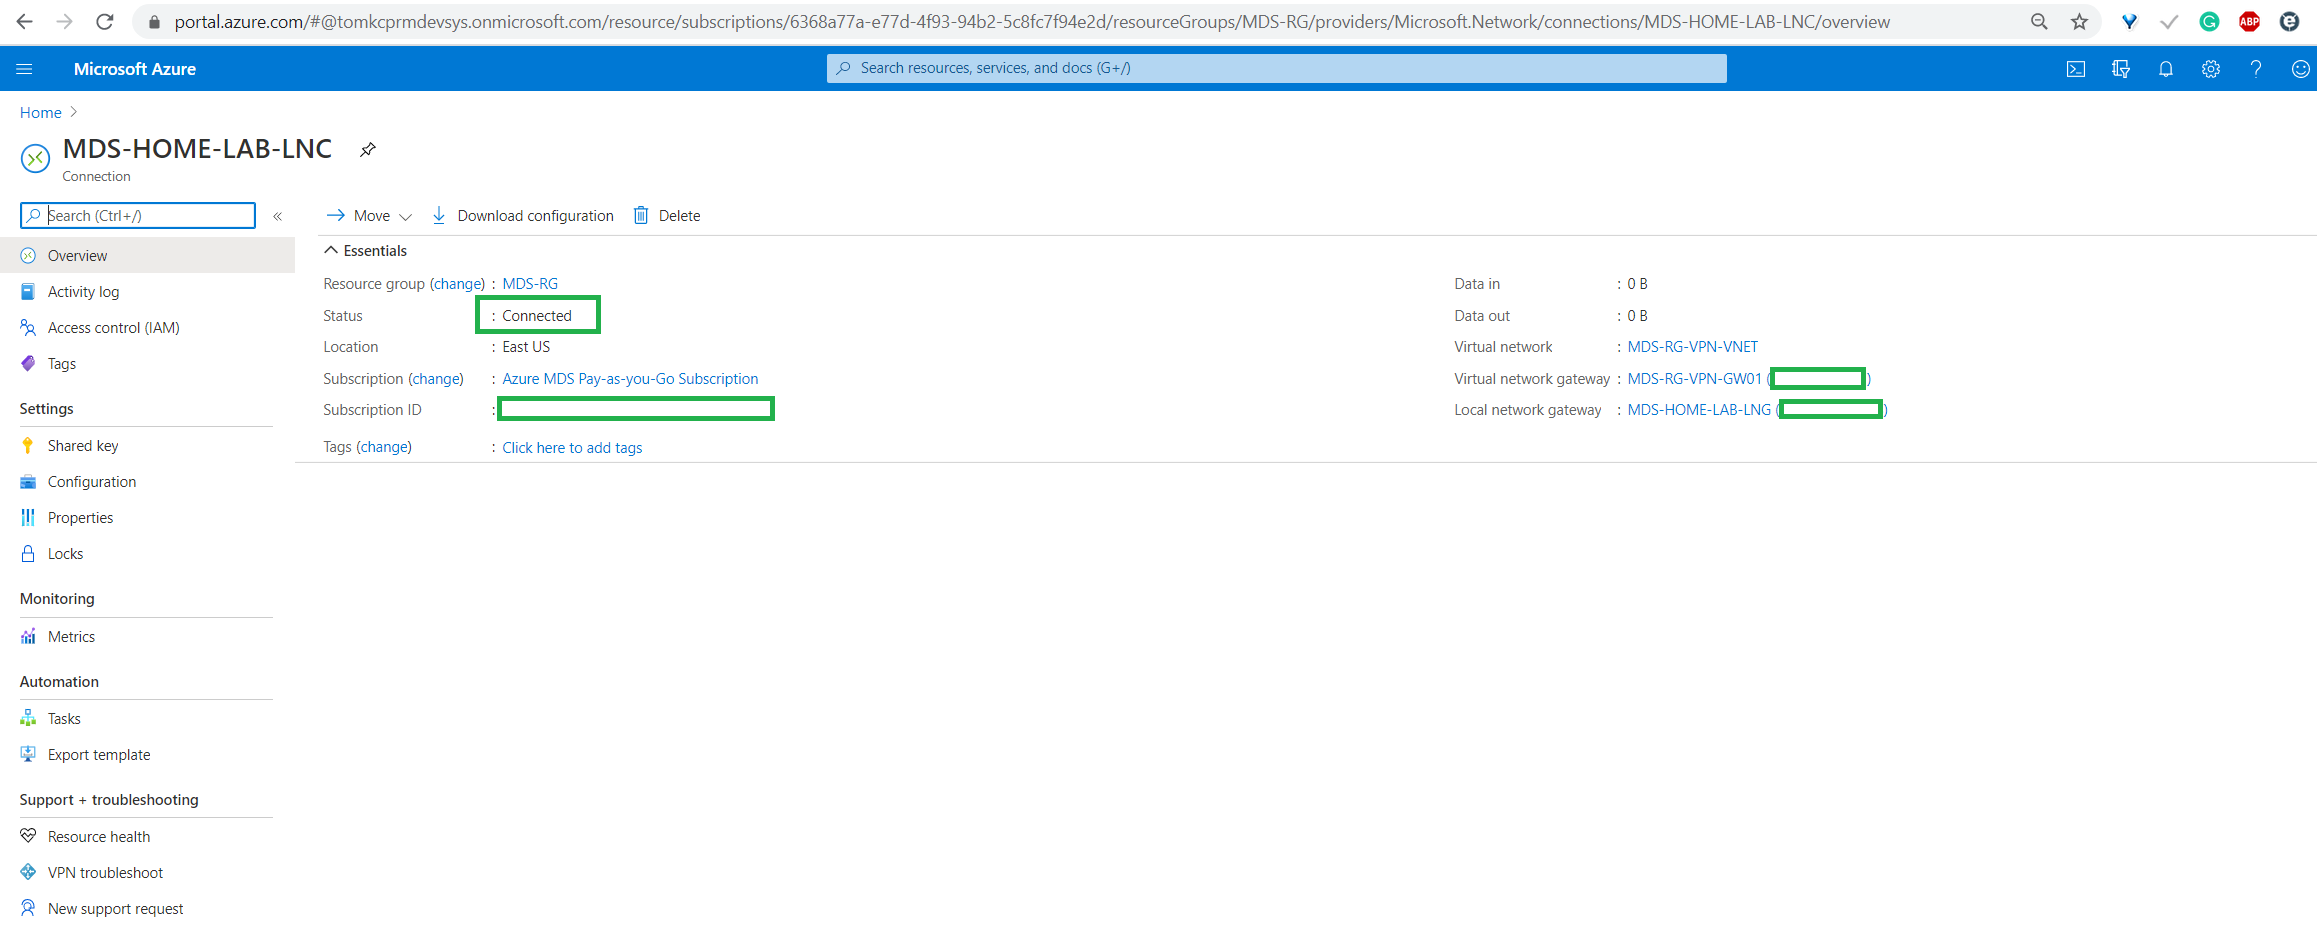
Verify the connection from the Azure side:
Verification on the StrongSwan side:
root@OWRT01:~# ping 10.10.10.4
PING 10.10.10.4 (10.10.10.4): 56 data bytes
64 bytes from 10.10.10.4: seq=0 ttl=64 time=48.515 ms
64 bytes from 10.10.10.4: seq=1 ttl=64 time=51.988 ms
^C
— 10.10.10.4 ping statistics —
2 packets transmitted, 2 packets received, 0% packet loss
round-trip min/avg/max = 48.515/50.251/51.988 ms
root@OWRT01:~#
Verify Log
I’ve included a full log of the successful session. It is below. Notice how not all blocks are loaded. Those not used can be removed. Alternatively, the blocks can be kept in case the same configuration is used on a directly connected GW router.

