

Linux LVM: Resizing partitions.
This post is designed as a blind test, meaning its sole purpose is for testing and learning LVM functionality. In this process we will work with an existing LVM that contains live data to grow, shrink and move it's contents around. Before we do anything, a disclaimer is in order:
DISCLAIMER: Aside from the disclaimer already present on the site at the bottom, I do not recommend you to follow these instructions. The exception exists where you wish to learn and test functionality on non PRODUCTION environments (ie meaning DEVELOPMENT or QUALITY ACCEPTANCE testing environments). Using these steps puts you at risk of loosing your data. BACKUP YOUR DATA BEFORE PROCEEDING. By reading the below and following any steps, you are agreeing to undertake any and all risks associated with the resulting consequences of following the steps on this site and post below.
Having said that, let's begin. First, we'll begin by getting some information and marking our LVM for change. The goal here is to eventually resize this partition that spans the entire 1.5TB to something much smaller (around 200GB) that we can copy to a smaller part of the hard drive to free space for a new installation and VG. NOTE: Only one hard drive will be used here to do this with:
Before we begin, please note the version of LVM we are using here:
LVM version: 2.02.83(2)-RHEL6 (2011-03-18)
Library version: 1.02.62-RHEL6 (2011-03-18)
Driver version: 4.20.6
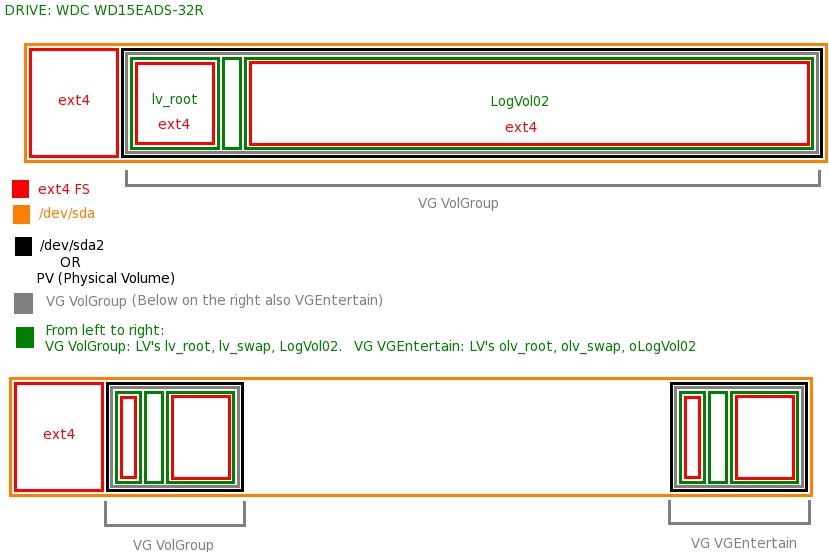
The main goal, is to resize and shape our LVM to make room for another installation. The images below illustrate the goals for this post. The final image represents the setup, including a resized copy (backup) of the original VG VolGroup called VG VGEntertain sitting on /dev/sda3 at the end of the partition:
If your version differs, these steps may not work the same way for you. The steps:
- fdisk -l (Just root partitions should be listed)
- lvm vgchange -a y
- fdisk -l (You should see the volume groups listed now.)
- Run ll /dev/VolGroup/ to locate and identify your partitions. Note the one you want to resize based on the fdisk and ll output above.
-
To check the partition, you may want to mount it first using these steps:
su
lvm vgchange -a y
lvm lvdisplay
mkdir /mnt/root
mount /dev/VolGroup/lv_root /mnt/rootThis is good for any data recovery etc.
- In this case I used it to verify that this is an ext4 partition from the /mnt/root/etc/fstab file.
-
After verifying the usage on the partition from last boot to it, I ran
resize2fs -p /dev/VolGroup/lv_root 32G
from 500GB. This partition was only 3% full anyway and I needed the extra space. This step may take a while.
-
Next type:
lvm lvresize /dev/VolGroup/lv_root –size 32G
This step should be quick but will give you a warning message before you resize.
-
Run and record the output of lvm pvs and lvm lvs. I booted with PXE so could scp the files to the server using scp lvm.pvs.lvs.txt 192.168.0.1:/home/Files/HTPC or equivalent for you.
-
At this point we need to manually 'defragment' by moving the other partitions next to each other in the volume group. We'll start with the swap. We'll delete it then recreate it.
-
I'll recreate the swap in this manner to move it to the beginning right next to the root partition:
lvm lvremove /dev/VolGroup/lv_swap
lvm lvcreate –size 4G –name lv_swap VolGroup
mkswap /dev/VolGroup/lv_swap -
There is another volume in my volume group LogVol02 where /home resides. I've got some files in there. It's 1TB and has about 100G of files on it. I'll extend this volume then shrink it down to a smaller size which should line it up with the above resized volumes. The steps are in reverse, somewhat, of the shrinking steps:
lvm lvextend -L+500G /dev/VolGroup/LogVol02 -
This however, gave me an error saying I don't have that much space to extend by. So I have to use a smaller number.
Insufficient free space: 128000 extents needed, but only 116792 available.
-
This message is telling us exactly how much we can extend it with:
500G/128000 * 116792=456.21875=NewSize
-
I rerun the command like this:
lvm lvextend -L+456218M /dev/VolGroup/LogVol02Rounding up size to full physical extent 445.53GiB
Extending logical volume LogVol02 to 1.32 TiB
Logical volume LogVol02 successfully resized -
Now we need to extend the filesystem in this LV (You can get the actual size of this volume from fdisk -l):
resize2fs -p /dev/VolGroup/LogVol02 1450G
But I got:
The containing partition (or device) is only 353992704 (4k) blocks.
You requested a new size of 380108800 blocks.Doing the math 353992704 * 4096 = 1449.95. Dividing this 3 times by 1024 yields 1350.375G (or 1382784M). I'll use M instead with this number. But it wanted me to run e2fsck on it first.
-
Resized the LV using:
resize2fs -p /dev/VolGroup/LogVol02 1382784M
This step is fairly quick but the next one isn't.
-
Now resize the file system back down before we also resize the LV down to 500G. (I have about 115GB of storage there anyway. This should give us about 1TB to work with):
resize2fs -p /dev/VolGroup/LogVol02 500G
This may take a while.
-
Next resize the LV to 500G:
lvm lvresize /dev/VolGroup/LogVol02 –size 500G
Now all your volumes should be resized and lined up. We should be able to resize the VG down to 538G now. You can mount the /dev/VolGroup/LogVol02 on /mnt/mr or another folder of your choosing then issuing df -h to check the size.
-
Now I run:
lvm pvresize /dev/sda2 –setphysicalvolumesize 500G (Really should be 538G)
This tells me:
/dev/sda2: cannot resize to 127999 extents as 137216 are allocated.
0 physical volmes(s) resized / 1 physical volume(s) not resizedThis calculated for me the numbers that I will need. However, I still couldn't extend even with sizes of 700G which told me that my attempt to grow then shrink didn't work as planned. My LogVol02 was now sitting in between two free areas only only shrunk around it's center so to speak.
-
We can see the above locations by issuing:
lvm pvdisplay –maps
which shows:
— Physical Segments —
Physical extent 0 to 8191
Logical volume /dev/VolGroup/lv_root
Logical extents 0 to 8191Physical extent 8192 to 9215
Logical volume /dev/VolGroup/lv_swap
Logical extents 0 to 1023Physical extent 9216 to 126007
FREEPhysical extent 126008 to 254007:
Logical volume /dev/VolGroup/LogVol02
Logical extents 0 to 127999Physical extent 254008 to 357648:
FREESo my outermost extent is 254008.
-
So what I'll do is shrink the LogVol02 down to a smaller size (Mounting and checking with df -h showed only 119G usage on it) instead of 500G so it is easier to move, shrink the PV to what ever the last used extent was, create another PV group in the now free space on the disk, move the LogVol02 LV to the new PV, remove the old PV and recreate it, then move the old LV back and remove the new PV created earlier in this step. All this should line things up. So here we go:
resize2fs -p /dev/VolGroup/LogVol02 150G (fsck if it asks you too)
lvm lvresize /dev/VolGroup/LogVol02 –size 150G
Check usage and space (Was at 85% after above): mount /dev/VolGroup/LogVol02 /mnt/mr; cd mr; df -h;
lvm pvdisplay –maps (Last FREE starts at 164408 instead of 254008, which is good) LV LogVol2 is now 0 to 38399 extents.
lvm pvresize /dev/sda2 –setphysicalvolumesize 643G ( 150G / 38399 * 164407. Complained about 642G ) Don't care about precision here. Just need to shrink to make room for a new VG. Only 164408 to 164606 is left at the end. This is tiny in comparison.The next step here was to create a new VG on the same PV:
lvm vgcreate BackupVG /dev/sda2
But that gave me:
Physical volume '/dev/sda2' is already in volume group 'VolGroup'
Unable to add physical volume '/dev/sda2' to volume group 'BackupVG'This was odd but could not find anything conclusive until I read this:
"PVs and LVs cannot be shared between or span different VGs" – http://en.wikipedia.org/wiki/Logical_volume_management
This basically says I can't have two VG's on the same PV in this case, on the the same /dev/sda2. So I have to resize the partition, then create a new partition on the free space, then a VG on that then move the LV to the VG on the new PV. (This is certainly turning into an exercise)
Now we determine the new end sector for our partition. Well need to verify numbers and calculate it:
lvm pvs –units g ( VolGroup PSize / PFree is 643.00g / 457.00g )
lvm pvs –units s ( VolGroup PSize / PFree is 1348460544S / 958390272S )
parted /dev/sda unit s print ( Start / End / Size for the lvm listead as 409663s / 2930272064s / 2929862402s. It is of type Primary and the flags are lvm)Because the VG is a whole unit, not fragmented, it's start to end should be exactly the sectors highlighted in green. So the next end sector should be the green and blue number (1348870207+2042(safety margin) = 1348872249 ). There is the extra free space in the middle we are trying to get rid of but that is included in the total VG size, which is good. If we really need that 1MB later, we can extend it.
WARNING: These steps will remove /dev/sda2 partition on sda and recreate it. If you did not get the end sector correct, this can truncate your partition resulting in DATA LOSS. There is NO backing out from this. Make sure you made a backup of your partitions earlier.
parted /dev/sda rm 2
parted /dev/sda mkpart primary 409663s 1348872249s
parted /dev/sda set 2 lvm on
parted /dev/sda print
fdisk -l /dev/sdaDone. Now check with parted /dev/sda unit s print and the end size should match exactly the number you specified above when recreating it.
At this point check the FS using e2fsck -f /dev/VolGroup/LogVol02 to ensure things are still fine.
Now I'm at the point where I have /dev/sda1 and /dev/sda2 and have about 500GB of free space to create another partition /dev/sda3.
At this point I'll boot up into the system to ensure things still can be booted up as well. This is the ultimate test. I'll return to the PXE boot on the second reboot. The system booted up fine.
Now we need to make another partition and VG to where we will move LogVol02. To do this, create a new partition /dev/sda3 then create the VG on that.
parted /dev/sda "mkpart primary ext4 1348462588s -1s" (Need the " because shell tries to interpret the – )
parted /dev/sda set 3 lvm on
lvm vgcreate BVolGroup /dev/sda3 (But this failed as I had to reboot after creating the above partitions before making VG's)
lvm pvcreate /dev/sda3
lvm vgcreate BVolGroup /dev/sda3 (This would create the PV but since we're doing this manually…..)Now we should be able to move the LV from /dev/sda2. The way we do this is not with LVM but rsync (or dd). dd should be quicker but can leave empty unusable space that could cause more work. This is because we cannot move LV's between VG's according to LVM rules. We could move LV's to other PV's within the same VG (A VG can span multiple PV's) but that is not our setup here.
Unfortunately, it occurred to me that since we can't move LV's between VG's, and I have more then 400G space in the middle of my VolGroup, I should be able to create a new LV, rsync between them, then rename the new one. This should do the trick:
lvm lvcreate –name /dev/VolGroup/LogVol01 –size 150G
lvm pvdisplay –maps (verify the volumes LogVol01 and LogVol02 are identical in extents)
mke2fs -t ext4 /dev/VolGroup/LogVol01
mkdir /mt/amr /mnt/bmr
mount /dev/VolGroup/LogVol02 /mnt/amr
mount /dev/VolGroup/LogVol01 /mnt/bmr
cd bmr
rsync -avh /mnt/amr/* /mnt/bmrSince the copy procedure target and source are using the same physical disk, the write/read speeds will be halved.
umount /mnt/amr; umount /mnt/bmr
lvm lvremove /dev/VolGroup/LogVol02
lvm lvrename /dev/VolGroup/LogVol01 /dev/VolGroup/LogVol02Let's see how everything looks like now before we resize the VG / PV:
lvm pvdisplay –maps
lvm pvs –units g ( VolGroup PSize / PFree is 643.00g / 457.00g )
lvm pvs –units s ( VolGroup PSize / PFree is 1348460544S / 958390272S )
parted /dev/sda unit s print ( Start / End / Size for the lvm on /dev/sda2 listead as 409663s / 1348872249s / 1348462587s. It is of type Primary and the flags are lvm)Finally, our LV's show to be lined up in the VG, with the free space showing up between extents 47616 and 164606. We now need to resize the VG / PV as we did earlier above, but to a now smaller size. So again, here are the calculations:
lvm pvresize /dev/sda2 –setphysicalvolumesize 187G (150G / 38399 * 47616 = 186. It complained about 186 as there is a fractional remainder)
Check again with:
lvm pvs –units s ( VolGroup PSize / PFree is 392159232S / 2088906S )
parted /dev/sda unit s print ( Start / End / Size for the lvm on /dev/sda2 listead as 409663s / 1348872249s / 1348462587s. It is of type Primary and the flags are lvm)Now we can shrink our /dev/sda2 partition to it's minimal size (409663s + 392159232S + 2048(safety margin)):
parted /dev/sda rm 2
parted /dev/sda mkpart primary 409663s 392570943s
parted /dev/sda set 2 lvm on
parted /dev/sda print
fdisk -l /dev/sdaRemove the backup volume we created earlier:
lvm vgremove /dev/BVolGroup
lvm pvremove /dev/sda3And let's test with a restart. After the reboot, we'll move the entire PV / VG to partition /dev/sda3 in preperation for installing Scientific Linux (Another RHEL 6.1 clone like CentOS but with OpenAFS and Kerberos pre included).
lvm lvresize /dev/VolGroup/LogVol02 -l+255 (to resize to the maximum VG size as only 255 extents were left available at the end.)
lvm pvsize –maps (Should now show no free extents.)There should now be ample 1.5TB – 187GB of free space on the physical device /dev/sda3. We'll now proceed to move everything to /dev/sda3 in the next step.
This is how things look now visually:
-
Now we'll create /dev/sda3 at the end of the disk with the exact same size as /dev/sda2. Then we'll pvmove from 2 to 3:
parted /dev/sda unit s print free
parted /dev/sda mkpart primary 2538115887s 2930277167s (Based on results of above command and START +1 for an exact size of 392161281s as /dev/sda2)
parted /dev/sda set 3 lvm on
parted /dev/sda unit s print free
lvm pvs -
Now we create the PV:
lvm pvcreate /dev/sda3
You will notice that after we create the above PV, it's size may be greater then the actual size reported by parted:
Before:
PV VG Fmt Attr PSize PFree
/dev/sda2 VolGroup lvm2 a- 187.00g 0After:
PV VG Fmt Attr PSize PFree
/dev/sda2 VolGroup lvm2 a- 187.00g 0
/dev/sda3 lvm2 a- 754.07g 754.07g
-
Notice the large PSize of 754.07g that doesn't match the 392161281s sector size of /dev/sda3 (Which should be equal to /dev/sda2). This is why we need to resize the PV to it's actual size before we extend anything:
pvresize –test -v –setphysicalvolumesize 392161281s /dev/sda3
pvresize -v –setphysicalvolumesize 392161281s /dev/sda3 (If everything is ok from the above step.)PV VG Fmt Attr PSize PFree
/dev/sda2 VolGroup lvm2 a- 187.00g 0
/dev/sda3 lvm2 a- 187.00g 187.07g(Double check with lvm pvs –units s and resize again if necessary to match /dev/sda2.)
-
Now we should be ready to extend the VG:
lvm vgextend VolGroup /dev/sda3
-
Finally, we do a pvmove from 2 to 3. Before you do, ensure that after the vgextend, both /dev/sda2 and /dev/sda3 print the same size by using lvm pvs –units s:
lvm pvmove /dev/sda2 /dev/sda3
lvm pvs -o +tags (To check the PV's in the VG VolGroup)The above will take some time since /dev/sda2 is around 187GB in this case:
-
Once the move is complete and without errors, reduce the VG by /dev/sda2:
lvm vgreduce VolGroup /dev/sda2
Mount and check manually. lvm vgdisplay should also show half the space again.
-
Now remove /dev/sda2 PV:
lvm pvremove /dev/sda2
-
Mount to /mnt/mr check manually and reboot to ensure it can be read fine:
ERROR: Mounting on /mnt/mr worked just fine but after the reboot, nothing mounted and subsequent lvm pvs, lvm vgs and lvm lvs all resulted in:
-
So my data was toast at which point I learned the very important commands the various online wiki's never informed me about: vgcfgbackup and vgcfgrestore. Unfortunately, I HAD NOT USED THE BACKUP.
WARNING: My system was toast at this point and I had no way to recover the data because I did not have the LVM restore files.
NOTE: Please read the post LVM: Recovering a lost volume. The below steps actually overwrote the VolGroup definitions as they were stored on the disk. I was not aware that the VG definitions were stored at the head of the partition before attepting step 32. DO NOT DO
-
A BAD ATTEMPT TO RECOVER. THIS STEP WILL PERMANENTLY DESTROY THE DATA ON THE DISK. TRY ONLY IF YOU ARE PRACTICING.
Here, we will try to recover our lost data by rebuilding the config backup we should have done earlier. We will try to rebuild the backup config manually from screen printouts we took earlier. First, we will recreate the basic structure we had earlier. Then, we'll modify this backup config with the same UUID's as in the original configuration.
lvm pvcreate /-u x0O0xW-TAXH-Vrz2-g299-pJm6-Mj5g-srkOBH –setphysicalvolumesize 47871e –norestorefile /dev/sda3
lvm vgcreate VolGroup /dev/sda3
lvm lvcreate –extents 8192 –name lv_root VolGroup
lvm lvcreate –extents 1024 –name lv_swap VolGroup
lvm lvcreate –extents 38655 –name LogVol02 VolGroupWe will now copy the VG backup from /etc/lvm/backup/VolGroup to our remote host so we can adjust the UUID's from the screen prints we took earlier. (Copy and paste is cumbersome on the recovery console or I simply do not know an easier way.)
scp /etc/lvm/backukp/VolGroup root@192.168.1.1:/recovery/
Once we adjust the VolGroup backup file, we will use the vgcfgrestore option to recreate it with updated UUID numbers.
Please see the link below for recovering at this point the proper way:
-
Now that we have recovered the LVM, I'll be sure to take backups of /etc/lvm/backup/<VOLUME GROUP> to any remote host. This way data can be recovered when needed instead of trying to recover the hard way.
-
After the above recovery, the partition is now in an extended state over /dev/sda2 and /dev/sda3, two partitions apart by about 1TB of data. Having tried the faulty pvmove method above, we won't retry it here. Instead we will shrink the partition back to /dev/sda2 and create a backup partition on /dev/sda3 of the same size as /dev/sda2. Then we will rsync / scp data between the two instead. Should be safer.
-
Here is the list of steps:
# lvm pvcreate /dev/sda3
# lvm vgcreate VGEntertain /dev/sda3
# lvm lvs –help
# lvm lvs –units s
LV VG Attr LSize Origin Snap% Move Log Copy% Convert
LogVol02 VolGroup -wI-a- 316661760S
lv_root VolGroup -wI-a- 67108864S
lv_swap VolGroup -wI-a- 8388608S# lvm lvcreate -L316661760S -n oLogVol02 VGEntertain
# lvm lvcreate -L67108864S -n olv_root VGEntertain
# lvm lvcreate -L8388608S -n olv_swap VGEntertain
# lvm lvs –units sLV VG Attr LSize Origin Snap% Move Log Copy% Convert
oLogVol02 VGEntertain -wi-a- 316661760S
olv_root VGEntertain -wi-a- 67108864S
olv_swap VGEntertain -wi-a- 8388608S
LogVol02 VolGroup -wI-a- 316661760S
lv_root VolGroup -wI-a- 67108864S
lv_swap VolGroup -wI-a- 8388608S
# lvm vgchange VGEntertain -a y
# mke2fs -ext4 /dev/VGEntertain/oLogVol02
# mke2fs -t ext4 /dev/VGEntertain/oLogVol02
# mount /dev/VolGroup/LogVol02 /mnt/mr
# mkdir /mnt/rr
# mount /dev/VolGroup/lv_root /mnt/rr
# mkdir /mnt/sr
# mount /dev/VolGroup/lv_swap /mnt/sr
# mkswap /dev/VGEntertain/olv_swap
# mke2fs -t ext4 /dev/VGEntertain/olv_root
# df -TFilesystem Type 1K-blocks Used Available Use% Mounted on
/dev tmpfs 2026840 224 2026616 1% /dev
none tmpfs 256000 129212 126788 51% /tmp
/dev/loop0
squashfs 128896 128896 0 100% /mnt/runtime
/dev/mapper/VolGroup-LogVol02
ext4 154818540 124239716 22714504 85% /mnt/mr
/dev/mapper/VolGroup-lv_root
ext4 33027952 13555808 17794424 44% /mnt/rr
-
At this point, knowing that my VG's and LV's were recovered, I rebooted to my old installation to take advantage of the GUI and Konsole to copy things between the two VG's I created a number of mount points and mounted each VG:
# mkdir /mnt/omr /mnt/orr /mnt/osr
# mount /dev/VGEntertain/oLogVol02 /mnt/omr
# mount /dev/VGEntertain/olv_root /mnt/orr
# mount /dev/VGEntergain/olv_swap /mnt/osr# mount /dev/VolGroup/LogVol02 /mnt/mr
# mount /dev/VolGroup/lv_root /mnt/rr
# mount /dev/VolGroup/lv_swap /mnt/sr
-
Next is to sync the two volumes together. For this I used rsync and went to sleep. The process completed overnight:
EX: rsync -avh <SOURCE> <TARGET>
# rsync -avh /mnt/mr /mnt/omr
Repeat the same thing for the other mounted folders.
-
Now we should also take a backup of the boot partition. For this again we can use dd. The below steps highlight the process. The most important thing below is that the two blue parts below have to match and the two green parts below have to match once you copy things over. Ideally, you want to save the new dd image file in the backup volume so it is not destroyed when we install the new OS:
# parted /dev/sda unit s print free
Model: ATA WDC WD15EADS-32R (scsi)
Disk /dev/sda: 2930277168s
Sector size (logical/physical): 512B/512B
Partition Table: msdosNumber Start End Size Type File system Flags
1 63s 409662s 409600s primary ext4 boot
2 409663s 392570943s 392161281s primary lvm
392570944s 2538115886s 2145544943s Free Space
3 2538115887s 2930277167s 392161281s primary lvm#
# dd if=/dev/sda1 bs=512 count=409600 of=./boot-partition.sda1
409600+0 records in
409600+0 records out
209715200 bytes (210 MB) copied, 9.41159 s, 22.3 MB/s
# ll
total 204824
3407876 drwx—— 2 root root 4096 Mar 9 2010 lost+found
3407874 drwx—— 4 root root 4096 Jun 13 2010 .Trash-0
3407875 drwxr-xr-x 20 root root 4096 Aug 31 21:57 Files
3407877 drwx—— 47 videouser videouser 4096 Sep 2 14:01 videouser
262145 drwxr-xr-x 10 root root 4096 Sep 24 01:39 ..
2 drwxr-xr-x 6 root root 4096 Sep 25 21:27 .
11 -rw-r–r– 1 root root 209715200 Sep 25 21:27 boot-partition.sda1
# parted /dev/sda unit b print free
Model: ATA WDC WD15EADS-32R (scsi)
Disk /dev/sda: 1500301910016B
Sector size (logical/physical): 512B/512B
Partition Table: msdosNumber Start End Size Type File system Flags
1 32256B 209747455B 209715200B primary ext4 boot
2 209747456B 200996323327B 200786575872B primary lvm
200996323328B 1299515334143B 1098519010816B Free Space
3 1299515334144B 1500301910015B 200786575872B primary lvm -
The last thing you want to check is if saving the boot partition above worked properly by mounting it using the loopback device on some free directory:
# mount /mnt/omr/boot-partition.sda1 /mnt/orr/ -o loop
If all went according to plan, you should be able to browse the newly created dd out file from the mountpoint /mnt/orr in above example.
-
At this point we are ready to install any new OS over the original VG's and PV's since a backup already exists of them.
IMPORTANT: Don't forget to take a backup of the VG groups as defined from /etc/lvm/backup/VolGroup and /etc/lvm/backup/VGEntertain per the above.
Cheers!
TK

