If you already started the dd command and need to see the progress and if it's stuck or not, use this line:
watch -n5 'sudo kill -USR1 $(pgrep ^dd)'
This will result in DD showing the following output, instead of being there without any progress shown:
[root@mbpc-pc log]# nice -n +19 dd if=/dev/sdj of=/dev/sdi
815429980672 bytes (815 GB) copied, 69693.4 s, 11.7 MB/s
1592775457+0 records in
1592775457+0 records out
815501033984 bytes (816 GB) copied, 69698.6 s, 11.7 MB/s
1592904529+0 records in
1592904529+0 records out
If you have not yet started your dd command, use and install pv (yum install pv):
dd if=/dev/urandom | pv | dd of=/dev/null
Cheers,
TK
March 20th, 2016 | Posted in NIX Posts | No Comments
Why do all the major Linux / UNIX vendors still use the deprecated bash / ksh features? Let's take this line as an example:
[root@mdskvm-p01 grub2]# grep platform_search_hint /boot/grub2/grub.cfg
if [ x$feature_platform_search_hint = xy ]; then
if [ x$feature_platform_search_hint = xy ]; then
[root@mdskvm-p01 grub2]#
This is GRUB2, the latest and greatest of the GRUB versions on RHEL 7.2. It may not be readily apparent in the above, but the author added an x to the beginning of each side of the comparison. This is because failing to do that will cause an error if $feature_platform_search_hint is empty. You do NOT need to do that if the proper bash / ksh methods are practiced and double [[ ]] instead of single [ ] are used. In the least the single backticks and the single brackets have been deprecated since 1988. It's 2016, 28 years later. We are doing Cloud yet we insist on using pre 1988 deprecated features. So the following represents a list of DO's and DON'T's to follow on scripting:
|
Deprecated
|
Replacement
|
|
“
|
$()
|
|
[ ]
|
[[ ]]
|
Moreover, and as an example, the single bracket is a command, not a bracket:
[root@mdskvm-p01 grub2]# [
-bash: [: missing `]'
[root@mdskvm-p01 grub2]#
A good thorough overview of the non deprecated features are available at this post on Bash Hackers.
Cheers,
TK
March 20th, 2016 | Posted in NIX Posts | No Comments
Unless you're doing driver development or kernel development in an isolated lab without the risk of outside breakins or compromization, jumping in as root directly to the Linux OS is considered insecure. So this post will not describe how to do that. However we will describe how to enable root sudo to root via an unprevilidged user:
su: pam_succeed_if(su-l:auth): requirement "uid >= 1000" not met by user "root"
To get started, if you find this line in /etc/pam.d/ remove the uid >= 1000 part to allow for sudo to root from an unprevilidged ID:
auth requisite pam_succeed_if.so uid >= 1000 quiet_success
check:
auth requisite pam_succeed_if.so quiet_success
Cheers,
TK
March 20th, 2016 | Posted in NIX Posts | No Comments
Setting the locale and keymap (keyboard) for the system is done via the localectl command.
localectl status
localectl list-keymaps
localectl set-keymap us
localectl status
localectl list-locales
localectl set-locale LANG=en_US.utf8
Cheers,
TK
March 20th, 2016 | Posted in NIX Posts | No Comments
Add the following option ( PEERDNS=no ) to prevent the /etc/resolv.conf from reverting or changing to it's original state and values (To ALL network interfaces.):
# cat ifcfg-eth0
DEVICE="eth0"
BOOTPROTO="static"
DNS1="172.0.0.20"
GATEWAY="172.0.0.1"
IPADDR="172.0.0.10"
NETMASK="255.255.255.0"
NM_CONTROLLED="no"
ONBOOT="yes"
TYPE="Ethernet"
PEERDNS="no"
#
Cheers,
TK
March 18th, 2016 | Posted in NIX Posts | No Comments
You can resume an SCP transfer using rsync:
rsync –partial –progress –rsh=ssh USER@HOST:<REMOTE FILE> <LOCAL FILE>
Or off the web use:
wget –continue <URL>
Cheers,
TK
March 13th, 2016 | Posted in NIX Posts | No Comments
\In this post we will create a chrooted SFTP login for guest accounts on our Linux distribution.
-
Locate your sftp-server binary:
# locate sftp-server
/usr/libexec/openssh/sftp-server
/usr/share/man/man8/sftp-server.8.gz
-
Use the result of the above to add this line to your /etc/ssh/sshd_config file (Check if this line does not exist already). Note, internal-sftp will point to the above sftp-server on login:
Subsystem sftp internal-sftp
-
Add the following line to the end of the file. First one is for group users and second is for the sftpuser. For this exercise you can choose one or the other:
Match Group users
ChrootDirectory /home
AllowTCPForwarding no
X11Forwarding no
ForceCommand /usr/libexec/openssh/sftp-server
Match User sftpuser
ChrootDirectory /home
AllowTCPForwarding no
X11Forwarding no
ForceCommand /usr/libexec/openssh/sftp-server
-
Ensure the sftpuser .ssh folder exists ( Or you will not be able to login since file /home/sftpuser/.ssh/authorized_keys will not be writable )
-
Add the sftpuser and associate them with users group:
# useradd sftpuser
# usermod -G users sftpuser
# id sftpuser
uid=508(sftpuser) gid=508(sftpuser) groups=508(sftpuser),100(users)
#
-
Ensure the chrooted folder is owned by root.root ( chown root.root /home/sftpuser for example. )
-
Issue /etc/init.d/sshd restart of service sshd restart.
-
Test the configuration:
Problems encountered:
# ssh sftpuser@192.168.0.36
FIPS integrity verification test failed.
sftpuser@192.168.0.36's password:
Write failed: Broken pipe
the chrooted folder is not owned by root. In case there are problems, also try to run sshd in debug mode to see about the causes: /sbin/sshd -p 2222 -D -ddd -e then use sftp -oPort=2222 sftpuser@192.168.0.36 to test connect there .
An example of a typical issue you can see is:
debug1: Could not open authorized keys '/home/sftpuser/.ssh/authorized_keys': Permission denied
debug1:
Simply create the folder above to allow for population of the authorized_keys file. Another error that can be seen is:
debug1: subsystem: cannot stat /usr/lib/openssh/sftp-server: Permission denied
Try to use one of the following (first one worked fine) instead:
Subsystem sftp internal-sftp
# Subsystem sftp sftp-server
# Subsystem sftp /usr/libexec/openssh/sftp-server
# Subsystem sftp /usr/libexec/openssh/internal-sftp
Have Fun!
Cheers,
TK
March 13th, 2016 | Posted in NIX Posts | No Comments
Enable NTP settings in DD-WRT on the Setup page like this ( EST as example ):
Time Settings
NTP Client: Enable
Time Zone: UTC-04:00
Summer Time (DST): last Sun Mar – last Sun Oct
Server IP/Name: ca.pool.ntp.org
End result:
root@DD-WRT-INTERNET-ASUS:/tmp# date
Sun Mar 13 15:38:45 UTC 2016
root@DD-WRT-INTERNET-ASUS:/tmp#
Cheers,
TK
March 13th, 2016 | Posted in NIX Posts | No Comments
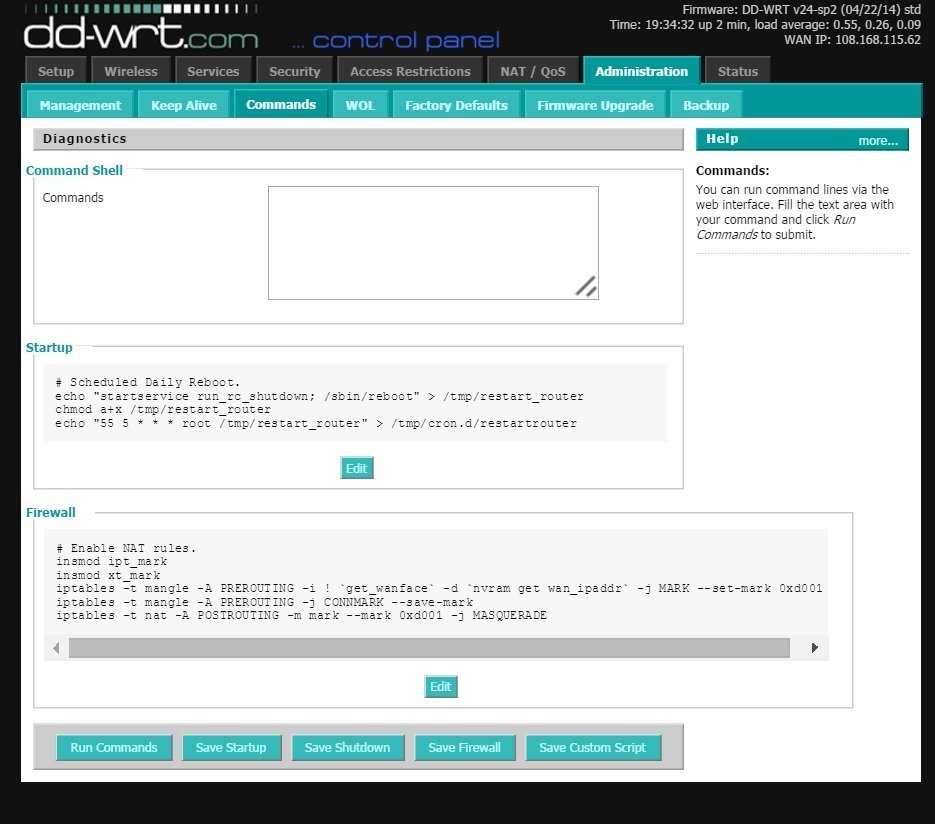
On DD-WRT, the port forwarding logic may not work at all. A fix for this is to use the following few lines in Administration — Commands — Firewall to enable port forwarding (NOTICE: Your forwarding rules should work out of the box. Test your forwarding rules with a page like this via an external source before you start adjusting below. ):
# Enable NAT rules.
insmod ipt_mark
insmod xt_mark
iptables -t mangle -A PREROUTING -i ! `get_wanface` -d `nvram get wan_ipaddr` -j MARK –set-mark 0xd001
iptables -t mangle -A PREROUTING -j CONNMARK –save-mark
iptables -t nat -A POSTROUTING -m mark –mark 0xd001 -j MASQUERADE
The result should be as follows:
Cheers,
TK
March 13th, 2016 | Posted in NIX Posts | No Comments
RedHat decided on a significant number of changes in it's new OS releases. This includes changes to the way the hostname is handled and maintained:
|
hostnamectl status
|
Check the hostname.
|
|
hostnamectl set-hostname <HOSTNAME>
|
Set all hostnames.
|
|
hostnamectl set-hostname <HOSTNAME> [OPTION]
|
Options are:
–pretty
–static
–transient.
|
|
hostnamectl set-hostname "" [OPTION]
|
Clear hostname. See options above.
|
|
hostnamectl set-hostname -H [USER NAME]@<REMOTE HOST>
|
Change hostname of a remote machine.
|
And that summarizes the hostname command for the new RH Linux releases.
Cheers,
TK
March 12th, 2016 | Posted in NIX Posts | No Comments


